Services
In Kubernetes, each pod is assigned its IP address but the pods can be destroyed easily and when a new pod is created in place of them a new IP address is assigned to them. Here the role of services comes into the picture. A service is like a permanent IP address assigned to a pod. A service IP address is stable. So instead of sending a request to a pod, the client requests a service, and the service forward that request to the desired pod.
Types of Services
1. ClusterIP Service (Internal Service): This helps in restricting the service within the cluster. It exposes the service within the defined Kubernetes cluster.
Example: Let us make a ClusterIP service for the Nginx Web Server using the following configuration:

Also, the ClusterIP service is the default service if we do not specify the service type in the config file as in the example above.
Now we can create this service by applying the following command:
$ kubectl apply -f [file-name]
2. NodePort Service (External Service)
NodePort extends the ClusterIP service and its visibility is internal and external to the cluster. You can set a NodePort using the NodePort property, this is the port that the service will listen on from outside the cluster. There is one requirement of using NodePort which is nodes must have public IP addresses. The port must be in the range between 30000 and 32767

Now we can create this service by applying the following command
$ kubectl apply -f [file-name]
- Load Balancing Service
Suppose we run a company and we want to hire some employees. We have shared a link on which interested candidates can share their resumes and book a slot for the interview. But our website can only handle about 10 people at a time. This can lead to the loss of great talent and eventually, this is a loss to the company. To solve this problem we needed load balancers. these load balancer launches a new clone website when the number of users reaches a certain limit and redirect those extra users to the newly created clone website.
#Service
apiVersion: v1
kind: Service
metadata:
    name: service-nginx
    labels:
      app: nginx-application
spec:
  selector:
    app: nginx-application
  type: LoadBalancer
  ports:
  - nodePort: 31000
    port: 80
    targetPort: 80
Ingress:
-> Ingress means the traffic that enters the cluster. -> Ingress exposes HTTP and HTTPS routes from outside the cluster to services within the cluster. Traffic routing is controlled by rules defined on the Ingress resource. -> Using ingress, you can maintain the DNS routing configurations. The ingress controller does the actual routing by reading the routing rules from ingress objects stored in etcd. -> Kubernetes Ingress builds on top of Kubernetes Services to provide load balancing at the application layer, mapping HTTP and HTTPS requests with particular domains or URLs to Kubernetes services. Ingress can also be used to terminate SSL / TLS before load balancing to the service.
How Does Kubernetes Ingress Work?
You need to be very clear about two key concepts to understand that.
Kubernetes Ingress Resource: Kubernetes ingress resource is responsible for storing DNS routing rules in the cluster.
Kubernetes Ingress Controller: Kubernetes ingress controllers (Nginx/HAProxy etc.) are responsible for routing by accessing the DNS rules applied through ingress resources.
Network Policies
Network policy is the primary tool for securing a Kubernetes network. It allows you to easily restrict the network traffic in your cluster so only the traffic that you want to flow is allowed.
Network Policy defines how the pods in the same namespace will communicate with each other and the network endpoint.It requires extensions/v1beta1/networkpolicies to be enabled in the runtime configuration in the API server. Its resources use labels to select the pods and define rules to allow traffic to a specific pod addition to which is defined in the namespace.
The main features of Kubernetes network policies are:
Policies are namespace scoped (i.e. you create them within the context of a specific namespace just like, for example, pods)
Policies are applied to pods using label selectors
Policy rules can specify the traffic that is allowed to/from other pods, namespaces, or CIDRs
Policy rules can specify protocols (TCP, UDP, SCTP), named ports or port numbers
Example:
apiVersion: networking.k8s.io/v1
kind: NetworkPolicy
metadata:
  name: my-network-policy
spec:
  podSelector:
    matchLabels:
      app: my-app
  policyTypes:
  - Ingress
  ingress:
  - from:
    - podSelector:
        matchLabels:
          app: other-app
    ports:
    - protocol: TCP
      port: 8080
DNS
DNS plays a critical role in Kubernetes networking, as it allows containers and services to communicate with each other using friendly names instead of IP addresses. Kubernetes includes a built-in DNS service that maps service names to their corresponding IP addresses.
Container Network Interface(CNI)
CNI plugins are responsible for configuring network interfaces on the nodes in the cluster. CNI plugins also provide network policies that define how containers can communicate with each other.
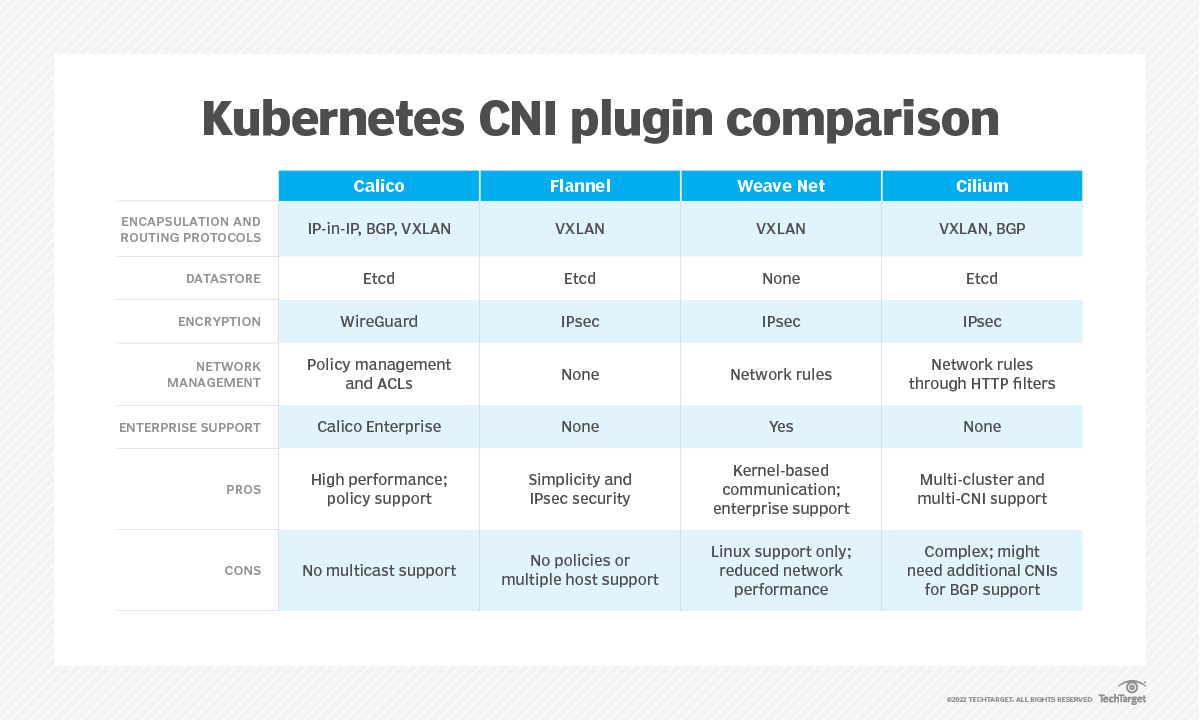
Compare Kubernetes CNI plugins
There are numerous CNI plugins for Kubernetes. Each plugin performs similar tasks and is installed as a daemon, but plugins differ in their design and approach to encapsulation, routing, data stores, encryption and support. Organizations should consider each of these factors when choosing a Kubernetes CNI plugin.

Calico
Calico is a popular open-source CNI plugin designed for flexibility, network performance, advanced network administration, and connection visibility between pods and hosts.
Flannel
Flannel is a mature and stable open-source CNI plugin designed around an overlay network model based on VXLAN and suitable for most Kubernetes use cases.
Weave Net
Weave Net, a product of Weaveworks offers CNI plugin installation and configuration within Kubernetes clusters.
Cilium
Cilium is an open-source CNI is known for high scalability and security that is installed as a daemon on each node of a Kubernetes cluster.
Multus
Multus is a CNI plugin designed to support multiple network interfaces to pods.
Thank you for reading this Blog. Hope you learned something new today! If you found this blog helpful, please share it with others.

