

Introduction
It is an open-source centralized platform designed to create deploy and run applications.
We can install Docker on any OS but the Docker engine runs natively on Linux distribution.
Docker is written in the 'GO' language.
Docker is a tool that performs OS-level virtualization, also known as containerization.
Advantages: Virtualization, Lightweight and Reusability
Features of Docker
Docker can reduce the size of development by providing a smaller footprint of the operating system via containers.
With containers, it becomes easier for teams across different units, such as development, QA and Operations to work seamlessly across applications.
You can deploy Docker containers anywhere, on any physical and virtual machines and even on the cloud.
Since Docker containers are pretty lightweight, they are very easily scalable.
Components of Docker
Docker Engine − It is used for building Docker images and creating Docker containers.
Docker Hub − This is the registry that is used to host various Docker images.
Docker Compose − This is used to define applications using multiple Docker containers.
Installation of Docker
Before installing docker, we need to update the OS with the latest packages, which can be done via the following command −
$ sudo apt-get update
Output
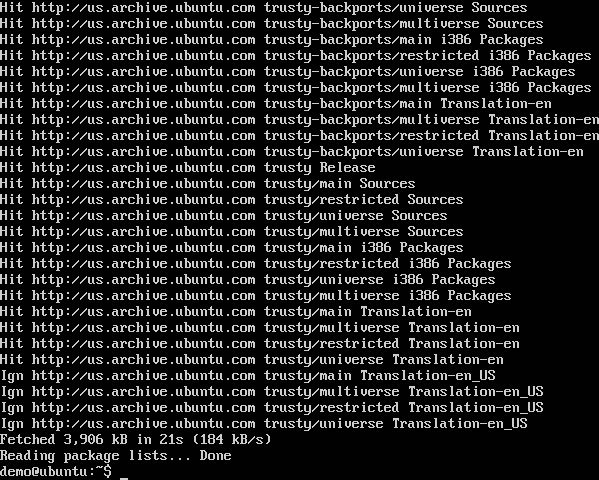
This command will connect to the internet and download the latest system packages for Ubuntu.
$ sudo apt-get install docker.io - install docker
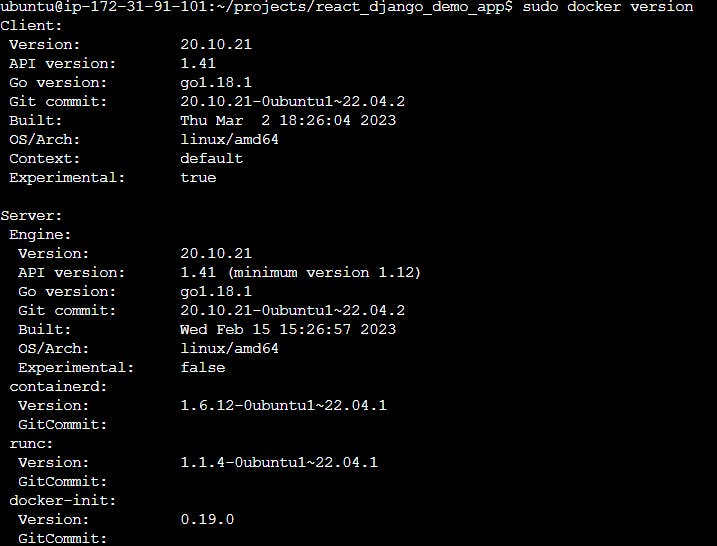
$ sudo docker version - to check the version
Docker Image:
An Image is a package of executable files that contains all of the code, libraries, runtime, binaries and configuration files necessary to run an application. A container can be described as the runtime instance of an image.
Containers:
Containers allow developers to package applications with all of the necessary code and dependencies that are necessary for them to function in any computing environment. As a result, containerized applications run reliably when moved from one computing environment to another. In the docker application, a container is launched by running an image.
Docker Architecture:
The following image shows the standard and traditional architecture of virtualization.
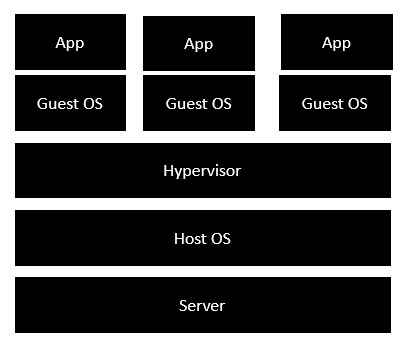
The server is the physical server that is used to host multiple virtual machines.
The Host OS is the base machine such as Linux or Windows.
The Hypervisor is either VMWare or Windows Hyper V that is used to host virtual machines.
You would then install multiple operating systems as virtual machines on top of the existing hypervisor as Guest OS.
You would then host your applications on top of each Guest OS.
The following image shows the new generation of virtualization that is enabled via Dockers. Let’s have a look at the various layers.
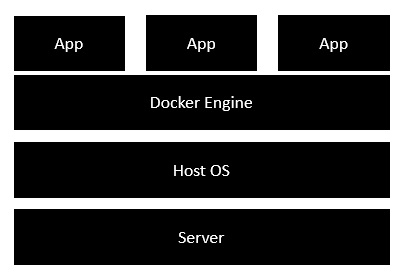
The server is the physical server that is used to host multiple virtual machines. So this layer remains the same.
The Host OS is the base machine such as Linux or Windows. So this layer remains the same.
Now comes the new generation which is the Docker engine. This is used to run the operating system which earlier used to be virtual machines such as Docker containers.
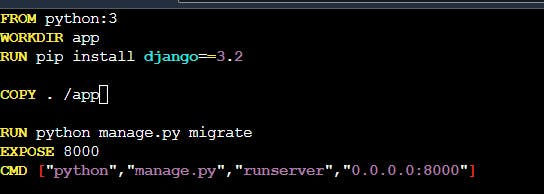
Docker File
Docker Image
Docker Container

By writing the code/script in the docker file and building the file we will get an image. And, when we run the image, we will get the container.
Docker Images: The read-only binary templates used to create docker containers or a single file with all dependencies and configurations required to run a program.
Different ways to create an images
- Take an image from Docker Hub
- Create an image from an existing Docker file.
- Create an image from existing docker containers.
Docker Container:
-> The container holds the entire package that is needed to run the application.
-> In other words, we can say that the image is a template and the container is a copy of that template.
-> Container is like virtualization when they run on the docker engine.
-> Images become containers when they run on the docker engine.
Docker Daemon (dockerd): It's a background process that always looks into containers (coming, exiting, running etc).
Docker Commands:
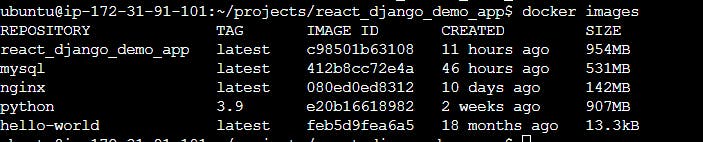
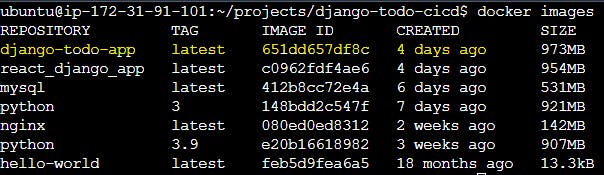
To see all images present in your local.
docker images
To see all containers
docker ps -a

To see only running containers
docker ps

To start/stop the container
docker start <container name> or docker stop <container name>

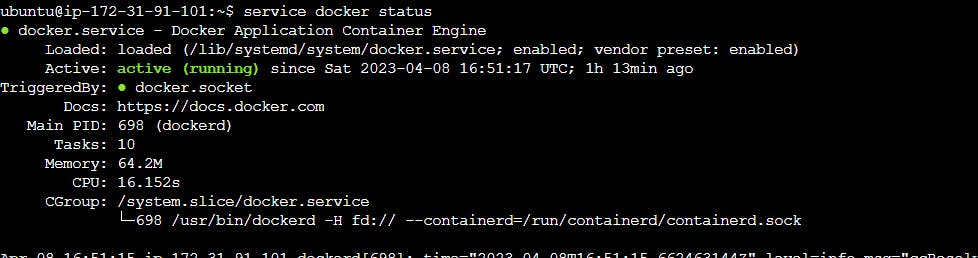
To check, whether the service is started or not.
service docker status or service docker info
To delete the container
docker rm <container name>

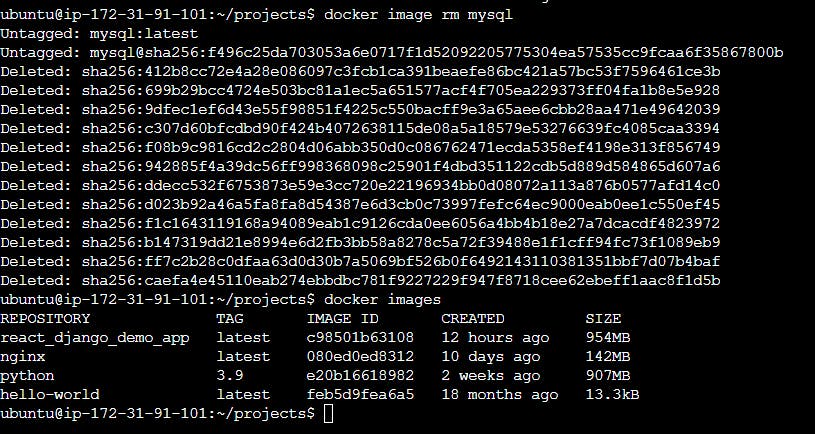
To delete images
docker image rm <image_name>
To download an image from the docker hub to a local machine
docker pull <image name>

How to run docker?
docker run -d -e MYSQL_ROOT_PASSWORD=test@123 mysql:latest

How to use a container?
docker exec -it <container id> bash

To exit from the container
hit the command "exit" two times.
To go inside the container.
docker attach <container name>
How to run an application through Docker?
Prerequisite: Clone the code., Always identify the type of application if data is not available by the developer, Remove the existing docker file from the project.(rm <filename>)
End Goal: Docker File -> Image -> Container
- Create Docker File

- Build an image from Dockerfile
docker build <directory/path> -t <name:latest>
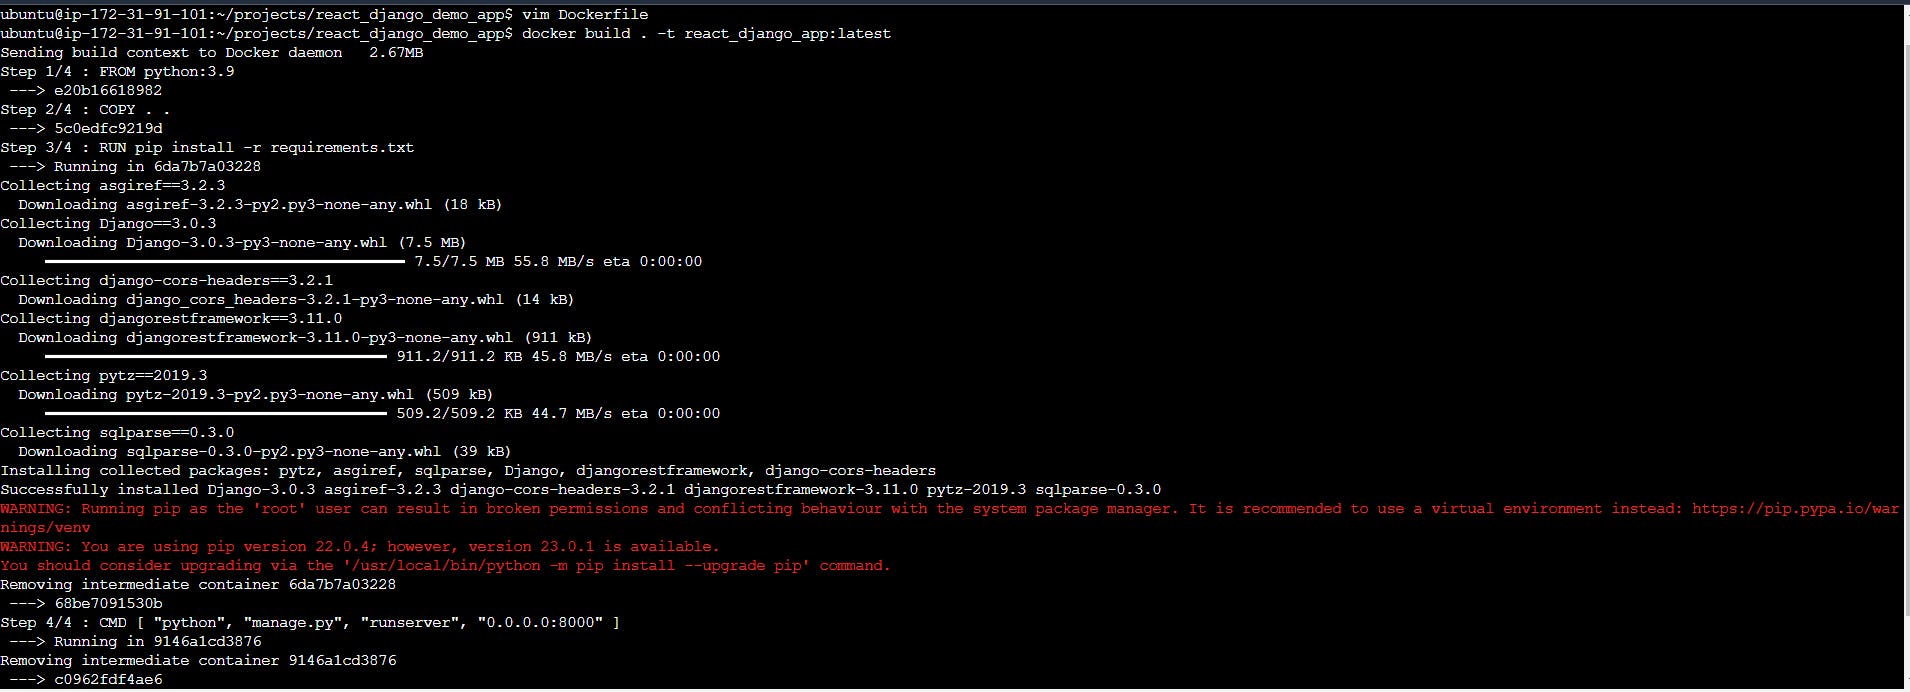
- Run/Create a container from the image
docker run -d -p 8000:8000 <imagename:latest>

Docker Advanced
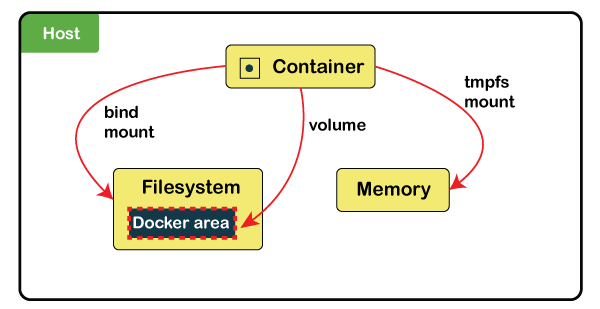
Volumes:
Docker volumes are file systems mounted on Docker containers to preserve data generated by the running container.
The data doesn't persist when that container no longer exists, and it can be difficult to get the data out of the container if another process needs it.
A container's writable layer is tightly coupled to the host machine where the container is running. The data cannot be easily moveable somewhere else.
Docker has two options for containers to store files in the host machine so that the files are persisted even after the container stops:
Volumes are stored in a part of the host filesystem, which is managed by
Bind mounts may be stored anywhere on the host system.
The volumes are stored on the host, independent of the container life cycle. This allows users to back up data and share file systems between containers easily.
Volume is simply a directory inside our container.
Firstly, we have to declare this directory as a volume and then share the volume.
Even, if we stop the container, still we can access volume.
The volume will be created in one container.
You can declare a directory as a volume only while creating the container.
You can't create volume across any number of containers.
The volume will not be included when you update an image.
We can map volume in two ways-
Container <- -> Container
Host <- -> Container
Benefits of Volume
Decoupling container from storage.
Share volume among different containers.
Attach the volume to containers.
On deleting the container, the volume does not delete.
Creating volume from Dockerfile
To Create Dockerfile
To create an image from Dockerfile.
syntax: docker build . -t <imagename>

To check image
To create a container from image
docker run -d -p 8000:8000 <imagename:latest>

To create volume for data persist
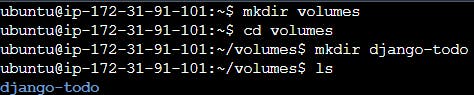
1)Create a directory for volumes
/home/ubuntu/volumes/django-todo - this path is required when we create a volume
- To create volume and inspect
docker volume create --name django_todo_volume --opt type=none --opt device=/home/ubuntu/volumes/django-todo --opt o=bind
docker volume inspect <volumename>

Attach volume with container
docker run -d -p 8000:8000 --mount source=django_todo_volume,target=/app django-todo-app:latest


Successfully mount the container inside the volume. In the above screenshot, both container and volume files are the same.
Let's create a log file inside the container and exit from the log: touch test.log

Now, check in the volumes directory test.log file is generated there or not.

Conclusion: Now, if your container is killed/crashed but still you have a backup of your container in the form of volumes. Whatever you add in your container or in your volume it will reflect both the places, vice versa.
To see all created volumes
$ docker volume ls

To get volume details
$docker volume inspect <volume name>
To remove all volume
$ docker volume prune
To delete volume
$ docker volume rm <volume name>
To get container details
$ docker container inspect <container name>
Docker Compose
Compose is a tool for defining and running multi-container Docker applications. With Compose, you use a YAML file to configure your application’s services. Then, with a single command, you create and start all the services from your configuration.
Compose all the services using the YAML file and execute them together.
Create a .yaml file where all services should be written.
$ vim docker-compose.yaml

Install docker-compose if not installed

Run Docker Compose
$docker-compose up


How to see the logs to check the issue and fix those issues in the YAML file?

Now both services are up/running. How to stop both services?
$ docker-compose down


No container running.
How can we add one more service in the same .yaml file?


Docker Swarm(Cluster)
A Docker Swarm is a container orchestration tool running the Docker application. It has been configured to join together in a cluster. The activities of the cluster are controlled by a swarm manager, and machines that have joined the cluster are referred to as nodes.
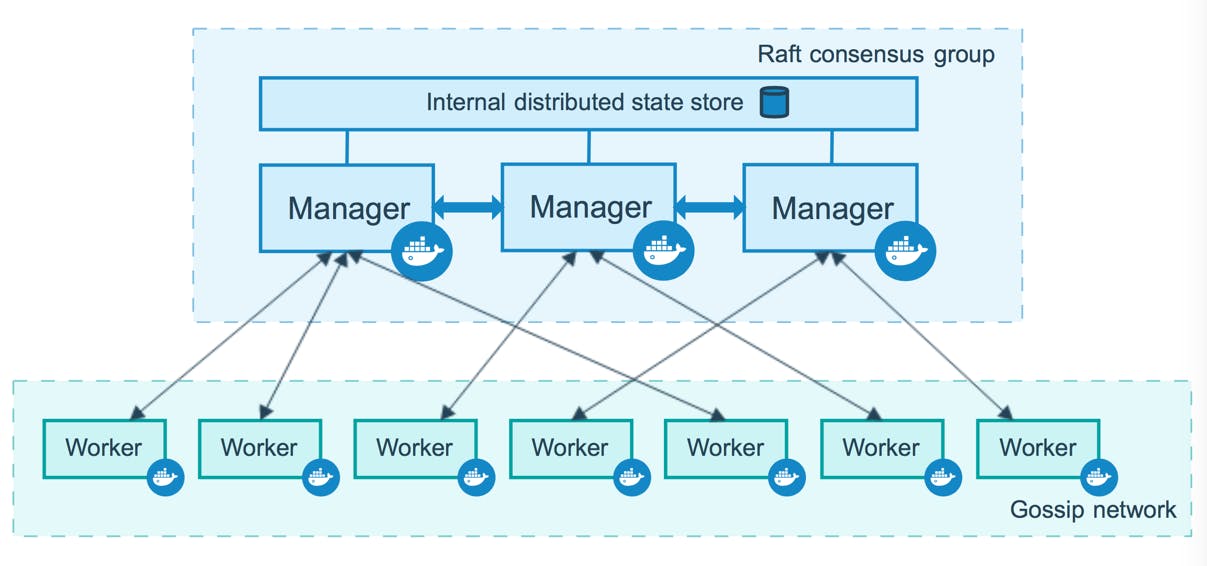
Components
Manager node. Maintains cluster management tasks
Worker node. Receives and executes tasks from the manager node
Service. Defines task that needs to be executed on the manager and worker node
Task. They are the docker containers that execute the commands.
Kubernetes vs. Docker Swarm
Features | Kubernetes | Docker Swarm |
Installation | Complex | Simple |
Load Balancing | Manual intervention is required for load balancing | Automated load balancing |
Scalability | Scaling and deployment are comparatively slower | Containers are deployed much faster |
Cluster | Difficult to set-up | Easy to set-up |
Container Setup | Commands like YAML should be rewritten while switching platforms | A container can be easily deployed to different platforms |
Logging and monitoring | Consists of built-in tools to manage both processes | Tools are not required for logging and monitoring |
Availability | High availability when pods are distributed among the nodes | Increases availability of applications through redundancy |
Data volumes | Shared with containers from the same pod | Can be shared with any container |
Commands
Prerequisite: Before doing hands-on on docker swarm create multiple machines/servers in AWS/Azure/Cloud. And, give the name master, worker1, worker2,worker3 etc.
Update and Install docker in all the machines (master, worker etc) using the below command
$ sudo apt-get update && sudo apt-get install docker.io
To set the docker engine for the current user and reboot all machines
$ sudo usermod -aG docker $USER
$ sudo reboot
Now, we will create a cluster/swarm between the master and worker-1
Step-1: Initialize a swarm in the master node
$ docker swarm init

Step-2: Now, add port 2377 to all machine's security group
Instance -> Security -> Security Group -> Edit Inbound Rules -> Add Rules -> Add Port in port box -> Save Rules
Step-3: Copy docker swarm join URL with token and paste it on the worker-1 machine
$ docker swarm join --token SWMTKN-1-2yao2jthwgw8gc32b38ne7gsofv9m645ves42mtbt3pvvny83r-21sks0dw7eroq6cyjxwcnhqrt 172.31.81.73:2377
Note: this token we can use in multiple worker machine to join with master machine

How to check nodes in the master?
$ docker node ls

Step-3: Create a Service in master
$ docker service create --name mysql-service --replicas 3 --publish 3306:3306 -e MYSQL_ROOT_PASSWORD=test@123 mysql:5.7

Step-4: Now, check in worker 1 machine
$ docker ps

Master allocated containers to worker-1 and worker-2 because I joined two worker machines with the master. So, the master allocated resources to worker machines.
How to do scale replicas?
Master:
$ docker service scale mysql-service=4


Note: If we reduce the replica size then it will scale down the resources.
How to run any app?
Before running any app, we need an image and for that, we can pull it from the docker hub. So, first, we push an image on the docker hub and then pull it from there in the master machine.
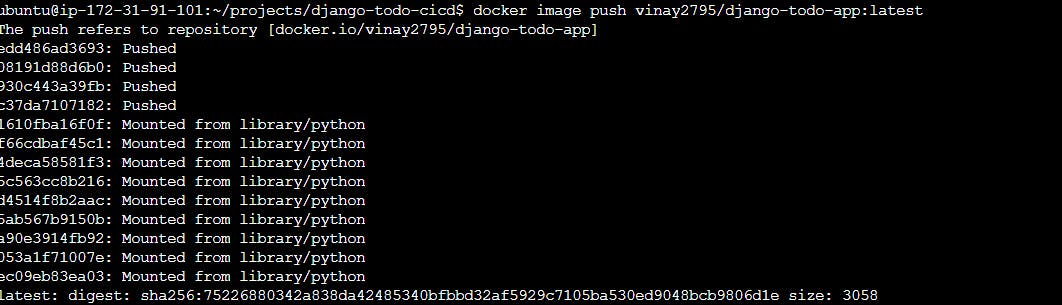
How to push any image in the docker hub?
$ docker login

My above machine is connected to the docker hub. Now, I can tag an image with my username.
$docker tag django-todo-app vinay2795/django-todo-app:latest

Push the tag image on docker hub
$ docker image push vinay2795/django-todo-app:latest

Now, I can pull this image from anywhere and use it. So, we will pull this image from the master machine and execute this app there.
Now, go to docker swarm master and hit the below command.
$ docker service create --name django-todo-service --replicas 3 --publish 8000:8000 vinay2795/django-todo-app:latest

Check-in worker machine

Deployment using the concept of Docker Stack
Docker Stack: Combination of services used in a docker swarm.
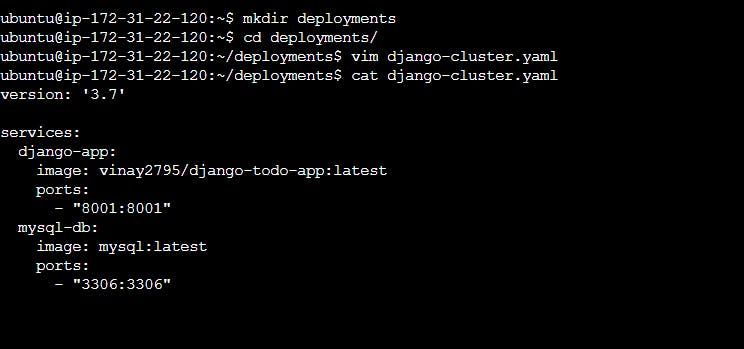
Now, I want to run multiple services by creating a YAML file in the docker swarm.
Step-1: Create a directory and inside that create one YAML file.
To check the running services
$ sudo docker service ls
To remove any service
$ sudo docker service rm <service name>
How to deploy yaml file where we added multiple services in form of the stack?
syntax: sudo docker stack deploy -c <yaml file> <stack name>
eg: sudo docker stack deploy -c django-cluster.yaml django-stack


How to check logs of any service?
$ sudo docker service logs <service name>

We forgot to pass the environment of MySQL root password in the YAML file, that's why it's not creating the replica for the worker machine. So let's fix this issue.

Let's remove the stack and deploy it again.


Now, adding the replicas to execute it in the worker machine also.
Master machine screenshot:
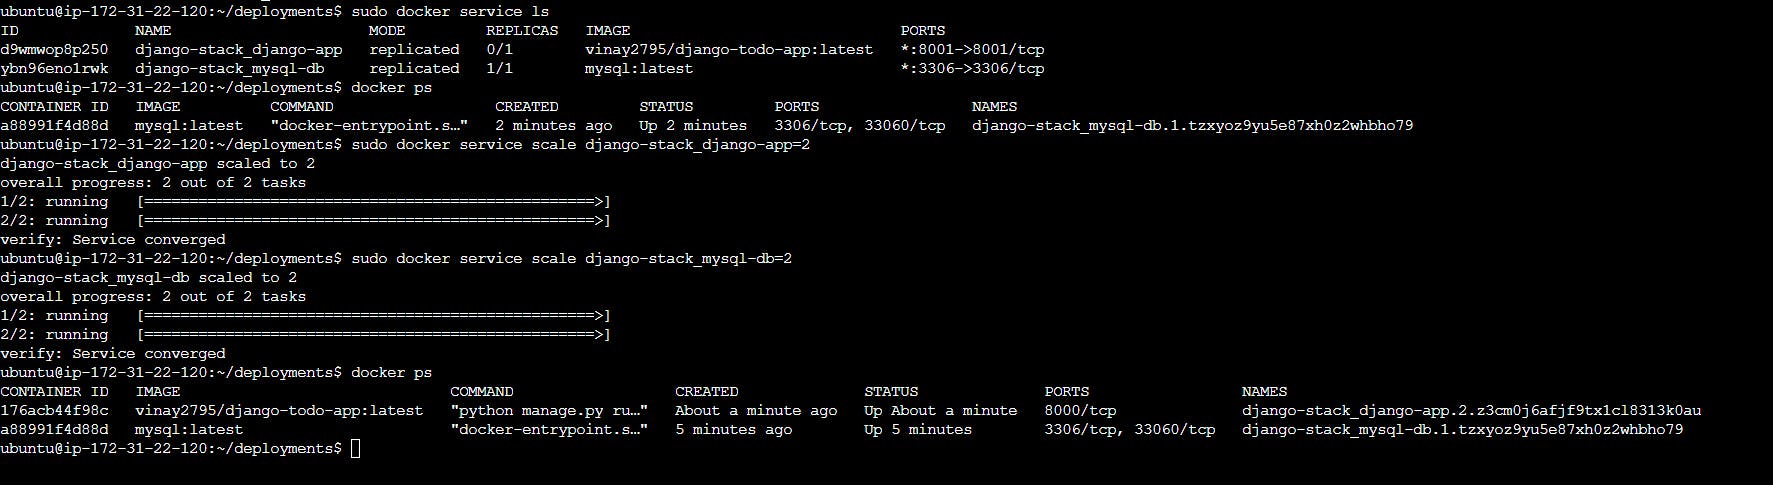
Created 2 replicas for both the service and the services running in both the machine master and worker.
Worker machine screenshot:

Let's suppose something is updated from the development side, then we have to update the image by creating a new image and pushing it to the docker hub.
To create a new image.
$ sudo docker build -t <image-name> <location>
eg. $ sudo docker build -t todo-app .
To push the image
$ sudo docker tag todo-app vinay2795/react-django-app
$ sudo docker push vinay2795/react-django-app:latest
Now, go to the master machine and change the service.
$ sudo docker service update --image <tag image-name:latest> <service name>
eg: $ sudo docker service update --image vinay2795/react-django-app:latest django-stack-app
Conclusion: It will update in the running container.
Thank you for reading this Blog. Hope you learned something new today! If you found this blog helpful, please share it with others.